Add a Wagtail blog app to your Django project
In this tutorial from guest author Michael Yin, we'll add a blog to your Django project, using Wagtail.


After you follow this tutorial, you'll have:
1. An independent CMS admin for you to manage your blog, coexisting with your Django admin.
2. A standard blog using a Bootstrap theme, on a `/blog/` URL.
3. Blog posts which support Markdown and Latex syntax.
Step 1 - Django Setup
First, let's create a Django project and get it running. If you already have a Django project, you can skip this step.
$ mkdir django_project
$ cd django_project
$ virtualenv -p python3 env
$ source env/bin/activate
$ pip install django==1.11
$ django-admin.py startproject my_django_project
$ cd my_django_project
$ ./manage.py migrate
Step 2 - Wagtail Setup
Note: Wagtail is not an out-of-the-box CMS just like Wordpress, but there are many great third party Wagtail blog projects on Github for you to review.
Here we'll use wagtail-bootstrap-blog as an example. It's based on Bootstrap and supports Wagtail 2.
$ git clone https://github.com/michael-yin/wagtail-bootstrap-blog.git

# copy the blog app and wagtailmd to the root directory of our Django project
$ cp -r ./wagtail-bootstrap-blog/blog ./
$ cp -r ./wagtail-bootstrap-blog/wagtailmd ./
In the root directory, you should now see
manage.py
my_django_project
db.sqlite3
wagtail-bootstrap-blog
wagtailmd
blog
blog is a reusable Django app. It contains all the static files, data models and templates for our blog application. wagtailmd provides Markdown support for our blog app.
Next, let's edit my_django_project/settings.py First, copy the content below of INSTALLED_APPS to our Django settings.py
INSTALLED_APPS = [
    'django.contrib.admin',
    'django.contrib.auth',
    'django.contrib.contenttypes',
    'django.contrib.sessions',
    'django.contrib.messages',
    'django.contrib.staticfiles',

    # Wagtail
    'wagtail.contrib.forms',
    'wagtail.contrib.redirects',
    'wagtail.embeds',
    'wagtail.sites',
    'wagtail.users',
    'wagtail.snippets',
    'wagtail.documents',
    'wagtail.images',
    'wagtail.search',
    'wagtail.admin',
    'wagtail.core',
    "wagtail.contrib.routable_page",

    # Third party package used by our blog
    'el_pagination',
    'modelcluster',
    'taggit',

    # local Django app we just copyed
    'blog',
    'wagtailmd',
]
Next, config SITE_ID and add WAGTAIL_SITE_NAME
WAGTAIL_SITE_NAME = 'Wagtail'
SITE_ID = 1
Configure MIDDLEWARE:
MIDDLEWARE = [
    ......

    'wagtail.core.middleware.SiteMiddleware',
    'wagtail.contrib.redirects.middleware.RedirectMiddleware',
]
Configure MEDIA
MEDIA_ROOT = os.path.join(BASE_DIR, 'media')
MEDIA_URL = '/media/'
After our settings are configured, run the commands below to install dependencies and to set up the database.
# Make sure you are in the same virtualenv we just created
# Install Wagtail 2.0 and other dependency needed
$ pip install -r wagtail-bootstrap-blog/requirements.txt
$ python manage.py migrate
Step 3 - Config Blog URL
Now Wagtail has been installed, we need to configure our URLs by editing my_django_project/urls.py
from __future__ import absolute_import, unicode_literals

from django.conf import settings
from django.conf.urls import include, url
from django.contrib import admin

from wagtail.admin import urls as wagtailadmin_urls
from wagtail.core import urls as wagtail_urls
from wagtail.documents import urls as wagtaildocs_urls

urlpatterns = [
    url(r'^admin/', include(admin.site.urls)),

    url(r'^cms/', include(wagtailadmin_urls)),
    url(r'^documents/', include(wagtaildocs_urls)),

    url(r'^blog/', include(wagtail_urls)),
]

if settings.DEBUG:
    from django.conf.urls.static import static
    from django.contrib.staticfiles.urls import staticfiles_urlpatterns
    # Serve static and media files from development server
    urlpatterns += staticfiles_urlpatterns()
    urlpatterns += static(settings.MEDIA_URL, document_root=settings.MEDIA_ROOT)
From the urls.py above, we can see that cms is the admin page for our Wagtail project, and blog pages are in the sub path blog. We config MEDIA_URL to make blog resources such as images work in debug mode.
Now we can check the result, by running our Django app with the command
python manage.py runserver
Check http://127.0.0.1:8000/blog/, where you should see a page showing Welcome to your new Wagtail site!. Congratulations! Wagtail has been setup successfully in your environment.
Next, we’ll configure Wagtail to make the magic work.
Step 4 - Customize Wagtail Blog
First, we create a superuser of our Django app
$ python manage.py createsuperuser
# enter username and password for later use
Go to the Wagtail admin page, http://127.0.0.1:8000/cms/ and enter the username and password you just created.
Below is page structure of our Wagtail application right now:
Root Page
    Home Page (Default page of our site)
Wagtail has a concept of a Hierarchical tree for pages to work. Next we'll create a Blog Page and configure it as our default page, so we can achieve the data structure below.
Root Page

    Home Page ()

    Blog Page (Default page of our site)
        Post Page 1 (We can create blog post page as children of our blog page)
        Post Page 2
        Post Page 3
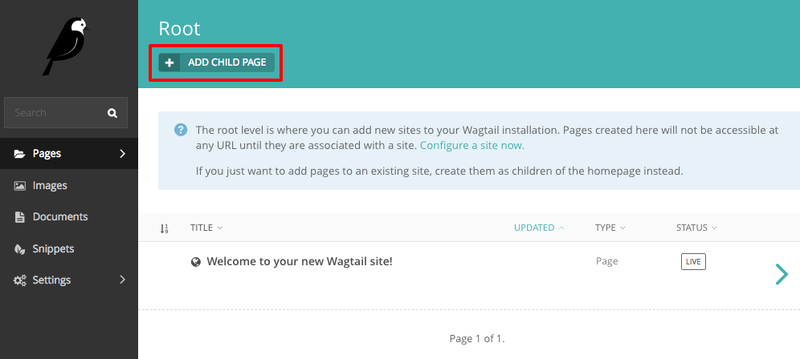
Go to http://127.0.0.1:8000/cms/pages/ - this is the root page of our Wagtail CMS. Click the Add a child page, and then choose BlogPage to create a new one.
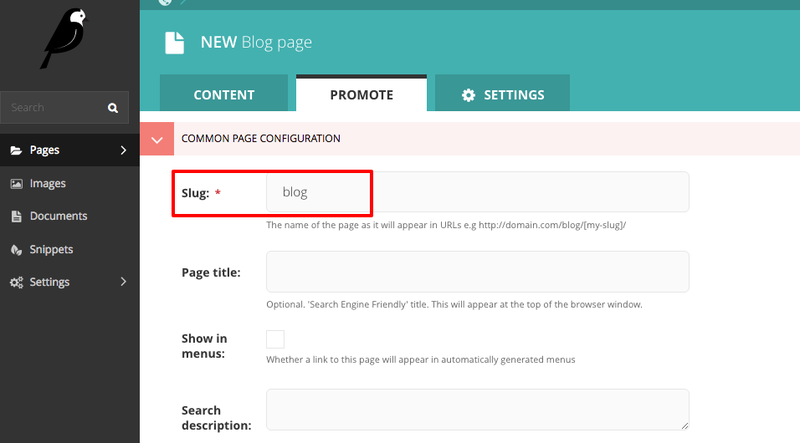
Input the title and description of the blog home page, and click the Promote tab, to make sure the slug value is blog. This step is important because the URL is generated by the slug value. When you’re done, click the publish button at the bottom.
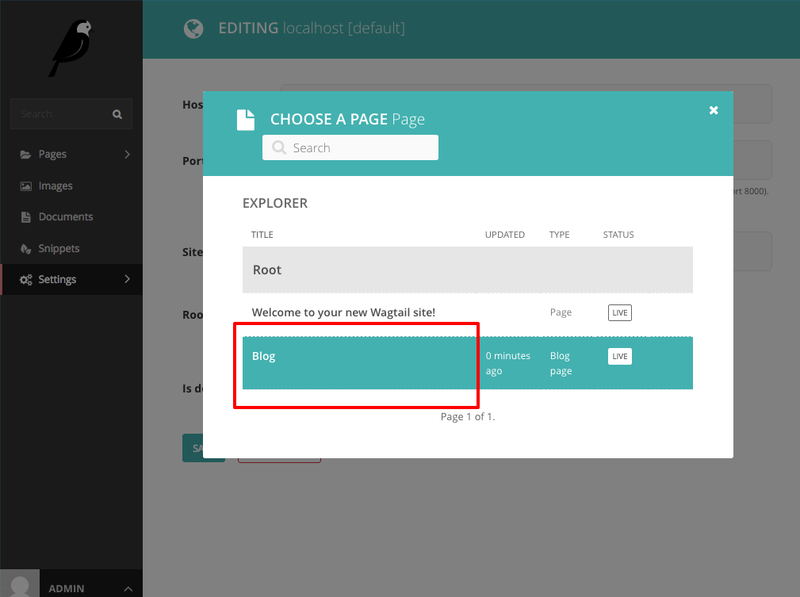
Now we configure Blog Page as our default page. Click settings/sites in the left panel, click Choose a different root page, choose the blog page we just created and then save changes.
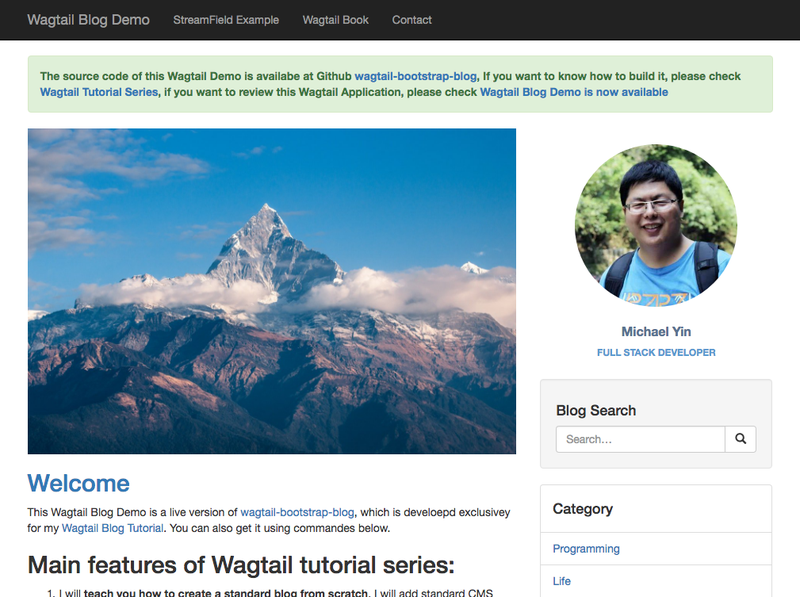
Congratulations, all the configuration work has done! Now you can visit your blog http://127.0.0.1:8000/blog/and see that the content has changed.
Step 5 - Write blog posts
It’s easy to publish blog posts with Wagtail. In Wagtail admin, click pages/blog in the left panel of Wagtail admin.
Create blog post pages as children of our blog, so our blog looks like this.
Step 6 - Change the blog theme
To help people understand how themes work, we’ve used a Bootstrap theme for the blog app, but you can change it easily if you like.
All the templates and theme files used by the blog are located in the blog folder. In most cases, I prefer to use the same theme files as my Django project, so it works well with any other Django apps.
Conclusion
You've added a blog to your Django project using Wagtail. All your blog posts are in /blog/, and your Wagtail admin and Django admin can coexist in your project. You can use the Wagtail admin to help you better publish and manage the content, images and documents of your Django project.
Now, where should you go next? Here are some suggestions.
- The comment system in this Wagtail Blog is using Disqus, so you’ll need to register a Disqus account and replace the code in the template blog/comments/disqus.html
- You can start to modify the theme and templates to make your blog look better.
- If you’d like to know more about how this Wagtail blog works, check this Wagtail Tutorial
If you have any questions about this article or Wagtail, please leave a message on my personal blog.