How to try Wagtail CMS without coding
How to setup Wagtail and explore the content management system without any coding.

Prerequisites
Before you get started you're going to need a free Heroku account. If you have one already, you'll be asked to log in a bit later in this post. There's no need to have duplicate accounts.
Getting started
Together, you and I will deploy the Wagtail Bakery Demo website. In total, this should only take about 10 minutes and it comes pre-populated with tonnes of data and a pre-made theme so you can see your changes as you make them. It's worth noting that a standard Wagtail website doesn't come with its own data set or images. Wagtail also has no opinions about your frontend technology (what the site will actually look like to your end-users) and there are no themes to use. Your team will need to create your theme in the future, and that's because every website is different. But for this example, you'll have all the goodies included to help you try Wagtail without any coding.
First, you'll want to navigate to the deployment link (click here). This will tell Heroku that you want to create a server using a template; that template is going to be the Wagtail Bakery Demo (source code can be found here).
Deploy to Heroku using the Wagtail Bakery Demo source code
You will be asked to sign into Heroku. Use your free account to sign in and you'll be presented with a page that looks like this:
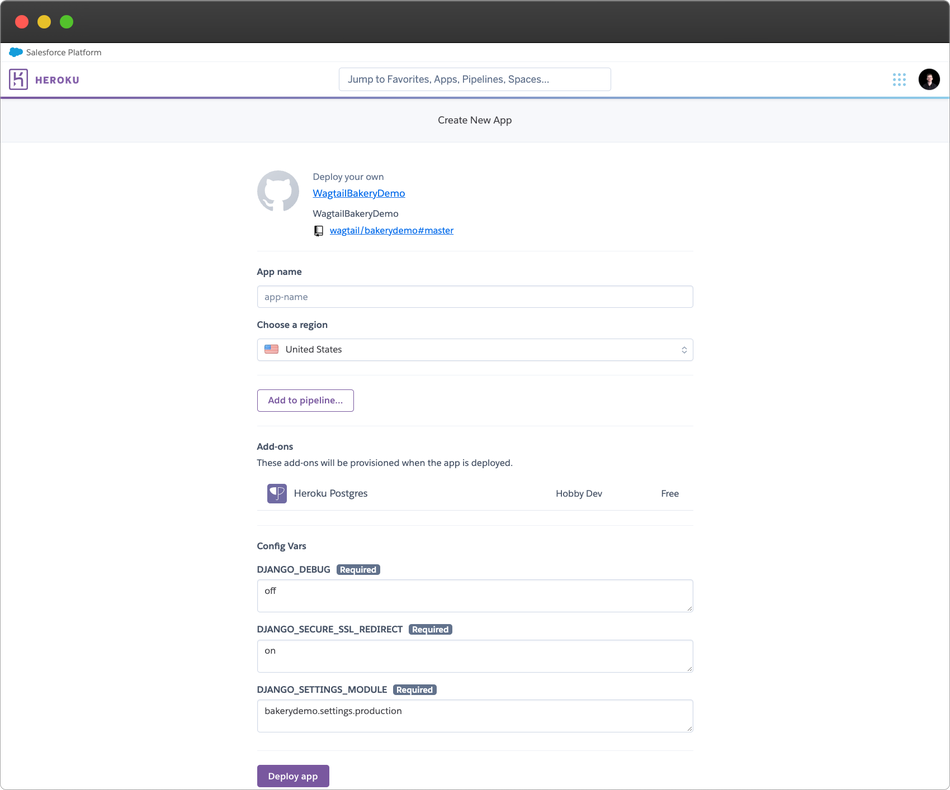
This is where most people tend to feel a bit overwhelmed. I'll walk you through what you need to do in the next section. Also, note that this will create a free Heroku server called a Hobby Dyno. After a few minutes of inactivity, your server, which is also known as a Dyno on Heroku, will go to sleep and wake up when your server is needed again. It can take a few seconds for it to wake up, but that shouldn't be an issue because you're just setting this up as a Wagtail demonstration.
Deploying your Wagtail app on Heroku
Almost all of the settings you need will be pre-filled for you. The only field you need to add is the first field called App name. I usually call this kalobdemo1 or something similar. You can also choose the region where your Wagtail website will exist - choose whichever option is closest to you. Everything else can stay the same.
Once you've entered the name of your app, scroll down to the bottom of the page and click the purple Deploy app button.
You'll see that Heroku created a new app for you, configured your developer environment for you, downloaded everything it needed, loaded the data your website will use, and deployed the application. This can take a couple of minutes to run since it's essentially setting up a new server from scratch. Go get a coffee or make a tea and come back in a couple minutes.
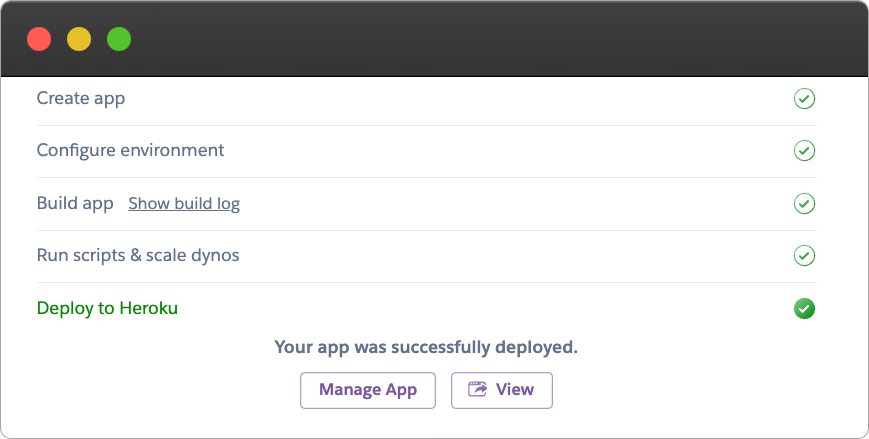
Once the app is deployed, click the View button at the bottom of the screen. This will open up a new window with your website.
Note: Your images are not going to show up. That's perfectly normal. Heroku does not come with a file system, so developers typically bundle Heroku with a service like AWS S3. Not sure what that is? That's OK, you can ask your developers about it.
Now that your bakerydemo website is set up, head on over to the admin by going to yourappname.herokuapp.com/admin/ - or simply add /admin/ to your URL.
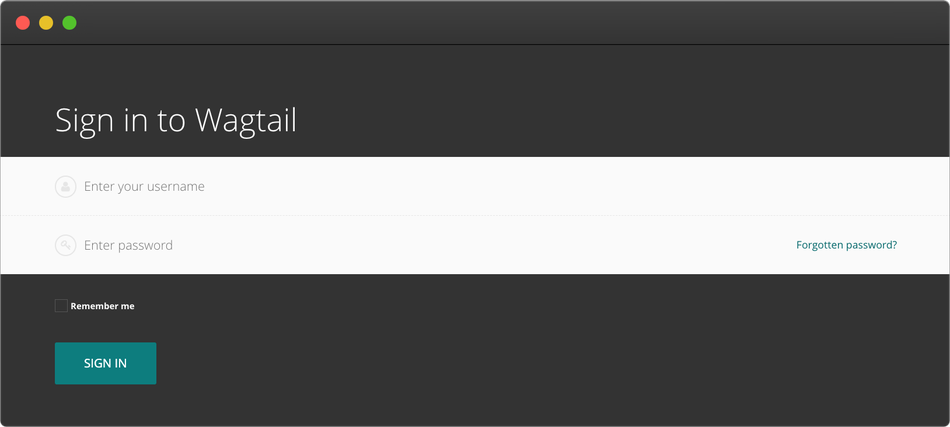
Once you find yourself on the Wagtail admin login screen, enter the following details:
Username: admin
Password: changeme
You should be logged into your own Wagtail website now! This is your website, so please feel free to explore and do anything you like on here. You can even create new user accounts for your team to sign in and explore Wagtail's admin interface.
Creating a new Wagtail Page
Pages are the core of Wagtail. Everything in Wagtail revolves around the idea that a Wagtail page should have all the information you need to display the page properly (as in there's no missing data). This includes other core features like images, documents, and snippets.
I'll show you how to create a new page from scratch.
In the left menu system, click on Pages - the menu will fly out with a list of your site's home pages. Wagtail can host multiple sites using one codebase (this is called multisite) so you have the option to have multiple home pages - one for each site. On your bakerydemo website, there is only one home page. Click the right arrow beside the "Welcome to the Wagtail Bakery!" and you'll see more pages come up. Click directly on the "Breads" folder icon and you'll be brought to a page that has all the available bread types.
Tip: What you just did was travel through the Wagtail tree, which is the natural hierarchy of pages that act like a folder/file system.
At this point, you should be seeing a page like the one shown below (please note the colours might be different, depending on the version of Wagtail you're using):
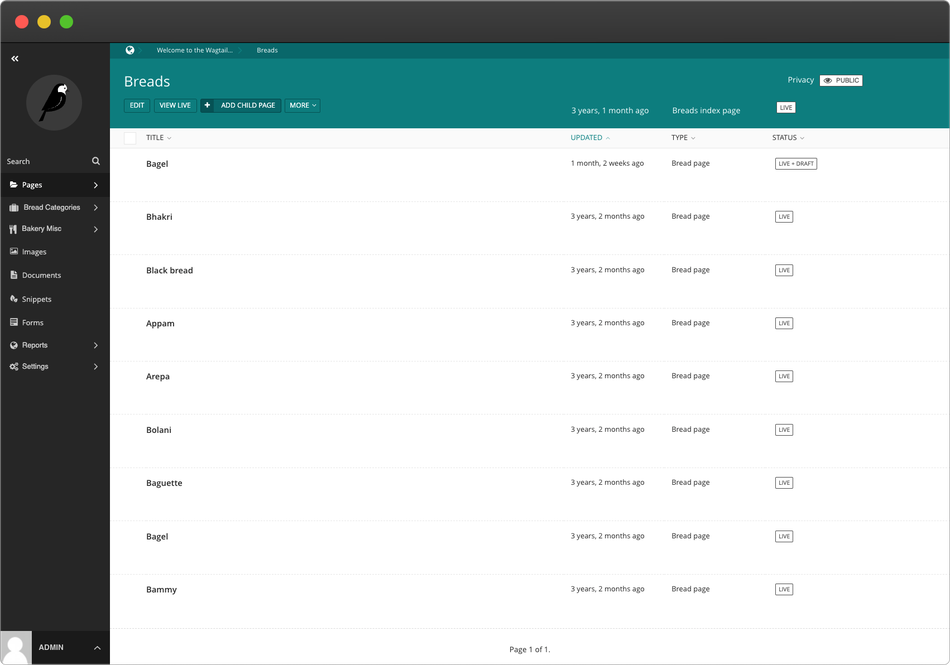
In the screenshot above are all of the available pages that live under the "Breads" page. These are known as child pages, and the Breads page would be the parent page. At the top of the page is a button to "Add Child Page" - you'll want to click that. You'll be automatically brought to the page editing interface. At this point, you should feel free to explore and try things out. And in the next section, you'll learn how to put together a post in the "Page Body" using one of Wagtail's most powerful features -- the StreamField.
Using StreamFields
StreamFields are a special kind of field in Wagtail. Normally, when you enter data into a field like the Title field, it's hardcoded in your template and will never change locations in your design. But with a StreamField, you get flexible content types that can be rearranged in any order you want.
What makes StreamFields so powerful is you can mix and match multiple content types (called blocks) on the same page. You can combine different block types to create pages with a more dynamic look that sticks to the precise designs created by your designers and developers
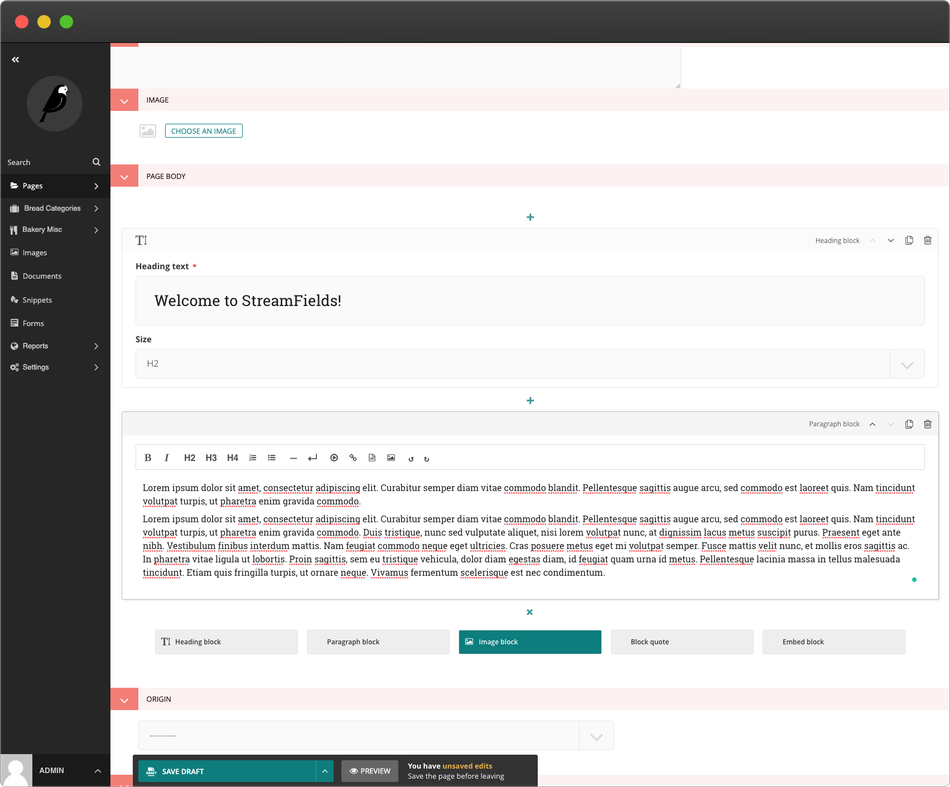
Scroll down to the middle of the page and you'll see a plus icon to add your first StreamField block. Your Bread Page will have five StreamField blocks by default. Your own website can have any number of custom blocks. Remember, this is just a demo site you're working on - Wagtail itself is incredibly flexible and customizable. If you don't see a block you want, then you can work with a developer to create a custom set of blocks that works for you.
Go ahead and try mixing and matching different blocks and previewing your page to see the changes. You can rearrange the blocks, duplicate blocks (saves time from copying and pasting), and delete each block one by one. Try it out and have some fun! Don't forget to use the green button at the bottom of the page to save your drafts, or to fully publish your page. You can also click the preview button at any time to see your drafted work. The worst that can happen is you make the page look funny and you try again.
Deleting your Heroku app
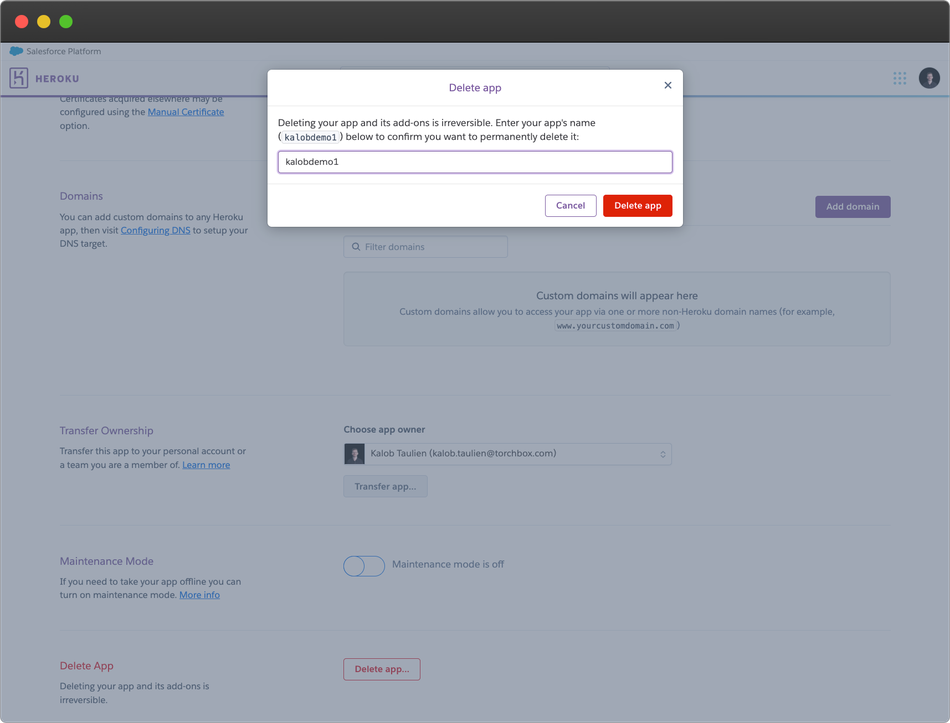
Once you're done exploring the Wagtail admin interface and you're ready to delete your server, head on back to Heroku (https://dashboard.heroku.com/apps) and click into your new app.
Note: Once you delete your app, you can't get it back; so make sure you and your team are done with this server before deleting it.
Near the top of the page is a submenu system with a link to the app settings. Scroll all the way to the bottom of the page and click Delete app... You'll be asked to type in the name of your app as a security feature.
Congrats! You were able to launch your website and make some edits to your first Wagtail website. And you cleaned up the server on Heroku as well. Job well done!
Next step: For developers
You might have a developer on your team that wants to see what the code is like and make real-life changes to the Wagtail Bakery Demo website. For that, your developer will need a free GitHub account to access the services provided by GitPod - a service that lets developers execute code directly from GitHub and in the browser. There is nothing to download, no environments to set up... it just works like magic.
For more information on getting set up with GitPod, see Coen van der Kamp's blog post on GitPod. Wagtail's Bakery Demo also has its own GitPod setup that's available here.